Showing posts with label Parties. Show all posts

Jan 28, 2013

Tweetheart Valentine's Day Party


 Valentine's day dessert table


You just have to go over to Quite The Occasion and check out this adorable Valentine's Day party we put together. I LOVE my side gig!

bird houses


Cupcake toppers
 
So cute right?  

Jan 15, 2013

Minute To Win It Party Games

Minute to Win it


We featured some great Minute To Win It games on the QTO blog today. 

Fun!  Thanks to my cousin Claudia for sharing the idea and photos!

~ Sarah


Dec 5, 2012

Vintage Fondue Party

So I didn't get a good picture of my new wreath last night.  We went out with friends from the neighborhood and had yummy Italian at Portofino's which is nearby.  I love that we could walk there!  So I will have that tomorrow.  But Be sure to check out what we have going on at Quite The Occasion today!

I did want to show this cute photo.  My brother has been posting lots of old pictures lately on facebook from old slides my parents had.  Many were before I was born when they lived in Belgium.  My Dad was stationed there in the army in the late 60's.  I stumbled upon this photo of a fondue party my parents threw for some friends.  This was probably 1969 or so.  Look at the matching placemats and napkins, how she set the fondue sticks out so cute and even did name cards.  Also love that she took a picture! 

 
As if I didn't know already, I can see where I get my love of parties from!  Love you Mom!

Nov 5, 2012

Caroling Party Invitation

Rudy and  I are so excited to host our neighborhood's 2nd Annual caroling party.  I had some fun putting together the invitation. 


These will be printed on card stock, hole punched in the corner and tied to candy canes. I can't wait to make the other printables for this party for the food, a bunting for my mantel and hot cocoa bar!  I love the little trees!

Jul 24, 2012

Sailboat Photo booth 99% Complete

I just need to attach a anchor on the sail and then it will be ready!

I painted the windows by simply painting free form circles.  I added some details to create the look of rounded glass.


 I added black dots to look like the bolts that keep these windows in place.


I purchased a short dowel rod and a seven and half feet long piece of shoe moulding.  The moulding was not quite long enough and the dowel a bit too long.  So I was able to use the left over piece from the dowel rod to solve the problem. 


Once I get the anchor created and secured I will have the final "after" photo.  Can't wait to all the sweet kids taking pictures with it!

Jul 20, 2012

Adding Trim to Sailboat Photo Booth

On Wednesday I wrote about the adorable sailboat picture booth I am making for a nautical themed birthday party.  Theresa and I are styling this event and can't wait to reveal all the photos!

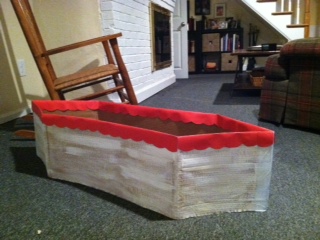
I am not finished yet but did add the trim last night.  This is definitely a project that takes longer than you expect it too!  As a reminder, I am adding the trim because 1. it will look cuter and 2. to cover up the painters tape I put around the edges to make it more stable.

First I cut red card stock in half lengthwise.  Then I took a glass to made my scalloped edges.


I cut out one as a template and then created a total of 8 to wrap around the boat.  I had to cut some smaller pieces to fill in the gaps.  I used tape to attach it.


Here is the boat with the trim.  This morning I noticed that some of the pieces were starting to pop off so I am going to back with glue.

Stay tuned for the finished boat after this weekend!

Jul 19, 2012

DIY No Sew Table Runner

I didn't get as far as I wanted on the sail boat last night...this is how I left it.


Hi Monkey!  I put another layer of paint and let it dry.  I am going to add a paper scalloped border along the top and paint portholes tonight or this weekend.

In the mean time I started working on the runners we will need for our nautical party.  We are creating two out of red, blue and white striped outdoor fabric.  The same fabric will be used on our sail so that they coordinate.

I cut the fabric the length I wanted - two yards.  The great thing about making runners yourself is that you can make them any length. 

Next I used stich witchery to hem the edges of the runner.


I did the long sides first and then the short ends.  As you can see I was left with a bit of over hang.


So I just snipped that off from the other side.


This gave me a nice clean edge.


We are going to be adding rope or some kind of nautical detail to the edges for this party.  Stay tuned for the final look after our big reveal!

Jul 18, 2012

Adorable DIY Sailboat Picture Booth for Nautical 1st Birthday Party

My friend Theresa and I are styling a nautical 1st birthday party and part of the decor will include an adorable sailboat picture booth.  Complete with a bumbo for each baby to sit in and sailor hat to wear!  Can you think of anything cuter than a baby sitting in a sailboat with a sailor hat on?  I can't!
Here is our inspiration picture from the Parents website.  They have a series on a nautical birthday party.   We are borrowing a lot of these ideas for this party.  I will be posting all our projects up until the party to be held on 7/28.

Cardboard boat

Nautical theme birthday party

We are going to make a few changes though so it is more baby friendly.   Instead of two full boxes I was able to use some scrap cardboard from a local hardware store.  This way I could make a six sided boat very easily.


  The first thing I did was cut it down so it was only about two inches taller than the bumbo.


Then I taped the top edges and "seams" to make it sturdier.  The inspiration boat folded the box flaps down which would serve this purpose without having to tape them.


We are going to paint it so it looks like a weathered sailboat rather than so much like a box.  So far I have covered it roughly with watered down gesso to get the whitewash look.  I will add the finishing touches tonight.


Also instead of a Tyvek and painters tape sail as described in the inspiration project, we are using the same fabric we purchased to make runners for the food table.  $6 a yard outdoor fabric which is very sturdy and will hold its shape nicely. 

Here is the piece I was left with after I cut out my runners.


Not exactly what the inspiration boat called for...because I used most of the fabric to make the two runners, I was left with a very long piece of fabric. So rather than a short wide sail, I needed to make a long thin one.


In order to make a perfect triangle (or nearly perfect) I took ribbon from corner to corner to make my cutting line.

I cut it out and the next step is to attach two dowels to the sail so that it is "sea worthy"!

I hope to wrap up the boat tonight to share with you tomorrow.  All of our official photos from the party will be on Monday July 30th!

Jul 5, 2012

Simple Beach 4th of July Decorations

Rudy, Reed and I are enjoying our visit at the beach.  We had the whole clan over for the 4th yesterday and of course I wanted to put together the decorations for the party.  I created these simple decorations from what we had on hand.  I only purchased a $10 bouquet of red carnations from Costco. 

We had a great time - hope you had a safe and happy 4th!


Thank you to Rudy for taking these pictures!  Did you create any decorations for the 4th?  I would love to see them!


Jun 29, 2012

Simple 4th of July Decorations

I am going to be spending the week with my family at the beach all next week.  As much as I would love to style the occasion and think of all these great DIY decorations, I really just want to be with the family.  So there will be pictures from our week to come, and definitely our tablescapes but they will be low key, relaxed and not involve much effort. 

I wanted share these for a little inspiration...keep it simple inspiration!

Stripey Table

Menu in a Bottle

Rustic Flags Centerpiece

Blue Glassware Centerpiece

Mom has lots of blue bottles at the beach - definitely doing this one!

Star Struck
I could easily do this one today!

DIY Bunting
Probably not going to do this one beacuse it would require buying fabric but so, so cute!

Lots of ideas to get me thinking - can't wait to share photos with you all next week!


Jun 28, 2012

Baby Food Jar Votives

The party that Theresa and I helped style on Saturday ended at about 7:00 because we all had our babies there.  If this party was just for adults, candles would have definitely been on the list of decorations needed.
I have been hanging on to my baby food jars knowing that I wanted to make some votives and other things out of them.

I wrapped the jars with coordinating paper that I used for the vases.


Rudy and I are having some friends over for dinner on Saturday night...I might just have to pull them out!

Jun 26, 2012

Going Away Party

Our good friends Nick and Natalie sold their house and are making the move to Asheville.  We are sad to see them go but so excited for them to start this new chapter in their life. 

Of course this was the perfect opportunity for a party!  My friend Theresa and I styled the going away gathering that my friend Bryn and her husband Matt hosted.  It turned out so cute that I wanted to share the pics with you.  It was a simple cookout but we added some special touches to it.  Thanks to my sweet husband for taking the photos! 


The colors were yellow, white and gray.  I picked up these flowers at the farmers market and put together these arrangements.


Theresa created this great farewell montage that we framed in a simple wooden frame.


Theresa also created this sweet banner that we hung in the breakfast room area of Bryn's house.


 Another fun thing we did is to have each guest complete a mad lib for Nick and Natalie.  They filled in their favorite memory, fun time and what they will miss most about having them here in Charlotte.


I wrapped a few of the vases with coordinating paper, ribbon and raffia. 


These coordinating pom poms and the chevron runner were the perfect details for this party.


Theresa and I made a great team.  The pom poms and runner she had on hand.  She created the banner and mad-libs game.  The day of the party I created the centerpieces and set everything up with Bryn's help. 

Can't wait for the next opportunity for Theresa and I to style another party!  If you have a gathering that you need help with let me know!  We would love to help you no matter what the theme, size or budget.
Related Posts Plugin for WordPress, Blogger...