Apr 25, 2012

DIY Striped Curtains

 My friend Karen recently tackled another DIY project.  You can read about her awesome laundry renovation to know that she has been busy in her new house.  I am so excited to be visiting her this weekend!  I will have lots of pictures to share of her new house and all the improvements she and her husband, Mike, have made.

Karen writes: 

Hi Sarah and thanks for having me again on your blog!  This time I’m back with a quick tutorial on how to make wide striped curtains for cheap.


There is a back story to this project that you should know.  First of all, we have both a den and a living room in our house (a 1968 brick ranch).  We decided when we moved in last May that the den would eventually be our tv/hangout/family room so we set to work on redoing it.  That left the living room with the old furniture in it.  In a weird way, I felt bad for that room. As soon as we got new den furniture and moved the tv it was pretty  much just sitting there empty and not fully decorated.  I decided I wanted it to look finished “just in case”.  Just in case my social life takes off and I host gatherings at my house and need a spare sitting room or just in case we want to spend time in a room without a tv.  Neither of these scenarios are very likely, but I assigned myself with the project anyway. 

I wasn’t going to spend a lot of money on it because when we do the big kitchen remodel, that room will become a formal dining room.  After talking to Mike (my husband), we decided that my budget was $0.  If I wanted it to look better it was time to get creative and make use of what I had. 

My decorating style goes something like this:  First, I realize I need to decorate a room.  Second, I panic and obsess and bore my husband with said obsession because I have no idea what I’m doing.  Third, I get over myself and decide to just go with it because I’m too cheap to hire help.  Fourth (and finally), I decide to start with curtains since they are such a huge part of the décor of a room.  Note – this is not a recommended method, but it works for me, well, so far anyway!

I read on A View Along The Way...

A View Along The Way


about painting striped curtains.  I had a light bulb moment and realized that I had the necessary supplies on hand: 

·         Sheets

·         Hem tape

·         An iron

·         Measuring tape

·         Paint

·         Painter’s tape

·         A paintbrush

 It went pretty quickly and easily from that point.  I used a king size flat sheet (ivory) and cut it into four panels (each about 24-26 inches wide).  I cut the length of each panel to 96 inches.  Then I used my iron-on hem tape to “hem” the edges.  So far none of these steps required any knowledge I’ve acquired since the third grade. 

All Things Lovely

Once my panels were cut and hemmed, I measured off 12-inch sections and marked them.  I used my painters tape to mark off the sections I was painting.  Remember at this point to put the tape at the top and bottom of the stripe so you have a full 12 inch section of stripe. After I did this I used my tape measure to double check and make sure that each section that was to be painted was 12 inches. 

People it’s simple:  measure twice, paint once! 

View Along the Way

It was time to paint.  I put a sheet down in my garage to paint on since the paint bleeds through the fabric and I didn’t want it to get on my garage floor.  I used a regular paint brush and the Rustoleum flat black paint in the can.  I did one curtain first just to see if there were any kinks to work out.  When it dried, the painted area was really stiff, so I thought I should try the textile medium stuff (that a blogger had referred to in her instructional post) to see if it would soften up the paint when it dried.  Just ask the clerk at A.C.Moore or Michael’s to point you in the right direction.  So on the next three curtain panels I used paint with the textile medium mixed in and they are a lot less stiff.  I also put the paint on pretty thick so that I wouldn’t have too many spots where the light came in. 

I let the panels dry thoroughly in my garage and peeled the tape off to reveal perfect stripes.

I love how they turned out! 


If you were to buy the materials you need for the project you could expect to spend: 

·       King sized flat sheet from Walmart - $16

·       Two small containers of rustoleum paint - $12

·       Iron on hem tape - $5

·       Painters tape - $5

·       Textile medium - $5

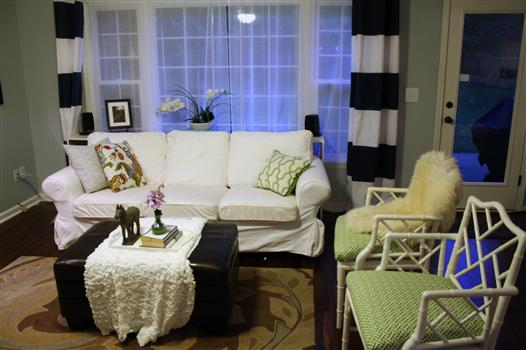
I have to tell you – I’m pretty impressed with myself!  Once I got them hung, I moved out the old coffee tables, one of the end tables, and rearranged some of the furniture and used stuff I already had.  I also hung two paintings by the lovely Sarah Hayden in that room.  Now the room has a bright, more whimsical feel to it instead of the traditional feel it had before. 

They look great Karen - thanks for sharing!  It is funny she referenced that painting.  I can remember painting that the summer before I moved to Charlotte.  We used to say it was an original by a "local artist" - local like she lives in the apartment local.

1 comment:

  1. Love this! Great job Karen and Sarah I love your blog!

    ReplyDelete

Note: Only a member of this blog may post a comment.

Related Posts Plugin for WordPress, Blogger...