Showing posts with label household. Show all posts

Jul 16, 2012

It's The Little Things...

Like cheery new kitchen towels.  If you have been reading this blog you know that I LOVE color.  The vibrant the better.  Kitchen towels are the perfect (and cheap!) place to bring color to your kitchen.  When purchasing a wedding gift for some friends, I couldn't help but pick these up from Crate & Barrel.

It's the little things I tell you!


They all coordinate to hang together.  I purchased Salsa Dos Blue, By the Pint, and Salsa Dos Yellow.


But in our house it is easier to do one at a time so most likely this is what you will find...hanging them this way makes it easier to dry your hands, put back on without having to fold it and helps it dry faster.


Jun 7, 2012

Mold Detective At Your Service

I have one more post to share from my sister's home but I also wanted to post about detecting mold.  I just couldn't end the week talking about mold so I am covering that today.  Beautiful living room pictures coming tomorrow!

Our son, Reed, has been wheezy and congested since January.  We thought it was a cold that turned into RSV but a couple of things made us think it might be allergies.  For starters when we went to Utah his symptoms completely went away.  And he was not getting better after a month of nebulizer treatments.  So off to the allergist we went.  I was so sure it was going to be our dogs or dust mites.

Turns out our little guy has a mold allergy.  Eeek!  Visions of gross mold making our boy sick made Rudy and I so worried!  Not to mention to bucks we would need to shell out to remedy a problem. 

So we called a mold detection service to come out to to the house.  They did not see anything suspicicious (he even put on a full white suit and crawled around in our crawl space) and our moisture levels were good.  But I was still not sure because he had the allergy and was better in Utah.  Maybe it is just Charlotte, maybe our house, maybe the daycare?

So the next thing I did was purchase these handy kits:


You have to buy at least two to get a reading of the suspicious area and one of the outside to be your control.  In a nutshell, if there is more mold growing in the inside petri dish than the outside, you have a problem.  I did an air quality test in his room and then in our back yard. 


As you can see we have much more on the outside than the inside so it confirms that we are in the clear.  In hindsight, I wish we would have done this first prior to paying $100 for the service to come but odds are I would have done both anyway. 

Next step is to do the same at the daycare.  Yes, I could just put Reed on allergy medicines and keep him on the steriod nebulizer treatments but the thing is that he is restless at night and now waking up at midnight to eat...we want our happy sleeper back!

Jun 6, 2012

Clever Kitchen Storage

So post two from my sister's house.  In her kitchen she has this great piece that actually was in our house growing up.  My Mom did the paint treatment probably back in the 70's.


I remember wondering why in the world she painted it that shade of green...seemed so outdated to me.  Funny how I love it now!
Claudia added these cute knobs.


Inside she keeps all of her kids crafts supplies so they are handy for her little artists to create a masterpiece right a the kitchen table.


She put cork inside the doors to post important information and notes.


Another clever storage fixture is right beside the refrigerator.  Even though it is a narrow spot, Claudia knew it would be the perfect place for her cook books.


She had our uncle build it and my brother-in-law secured it in place.  She painted it the same color as the walls and filled in with her books and other goodies.  What a great way to use what some would think is an unusable space!

Jun 5, 2012

Laundry Room/Bar Combo

I got back from visiting my sister yesterday...sorry for the lack of posts!  But I have lots of cute things to show you from her house.  She doesn't have a small house by any means but an older house so as you can imagine storage isn't as great as the newer houses.  She has really found some clever ways to combat that which I can't wait to share with you. 

Today we will start with the adorable bar she created in her laundry room.  This is directly off of the kitchen and living room so the perfect spot when you are entertaining. 


My sister has a great whimsical traditional style.  Behind the green lattice fabric is the washer and dryer as well as a organizer cart.  (Ignore the floors...not totally complete yet!)


Above she has all of her glassware, pitchers and ice buckets stored.


Love the little detail of the dragonfly knobs.


This antique mirror is a nice touch.  When she entertains she lights a candle in front which gives off nice reflections on the glasses and creates great ambiance. 


And to go with the theme a lovely cork wreath created by yours truly one year for Christmas.  I like this symmetrical design I did.


The fabric was hung with a cafe rod along the front of the bar top attached like this.


Nice to see how a boring laundry area could be transformed into a bar so you can get two uses out of one space.  Plus a great way to conceal the washer and dryer.


Tomorrow I will show how to utilize 10 inches of wall space to create a functional bookcase and smart storage in the kitchen.

Hope you all had a great weekend!

May 22, 2012

Final Touch On Kitchen

My kitchen organization was only missing one detail.  The top shelf in my spice and cooking cabinet was all that was left.


Luckily my neighbor had his table saw out last weekend and was kind enough to cut it to fit.  The shelf was a purchase from The Container Store.


Here is Patrick using his table saw to cut it.  Thank goodness for handy neighbors!  Here is the cabinet complete!  


It is amazing how much more space I have by rearranging things and adding this shelf. Glad that the project is finally complete!

May 15, 2012

Thank Goodness For Vinegar

This past weekend our kitchen our kitchen was not its fresh and usual self.  A co-worker told me the other day that boiling vinegar in water on the stove was an old fashioned way to remove odors in the house.  I pulled out the vinegar and was hoping it would work its magic.  I simply poured about 1/2 cup into about 4 cups of water and put it over heat. 

In about 30 minutes the smell was gone and replaced with the smell of vinegar.  I thought - this is genius, you just replace one smell with another smell.  But in about 20 minutes we were coming up roses!  A great thing about vinegar is that it is natural and cheap.

Check out other vinegar tips here!

Apr 24, 2012

Kitchen Organization Reveal - Part 2


I think Joy of Cooking really sums up my time spent in the kitchen.  I love to cook but disorganization was getting in my way.  This organized kitchen is not about everything matching...or everything with pretty labels.  It is about getting a space back to its true intent - to bring joy to cooking.

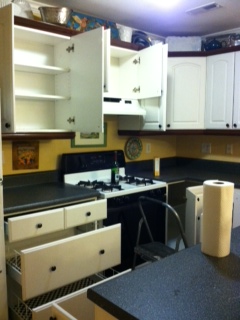
Here is a snapshot of my kitchen before I even decorated above the cabinets.


And here it is now.  It didn't photo well but it is very cheery!


My pantry cabinet is cleared out and not over flowing.  The green basket (dollar store find to replace the expensive ones from the Container Store) is full of Reed's baby food.

 This top drawer holds all of my cooking utensils.  Even our sharp knives are in there which gets them off of the counter.


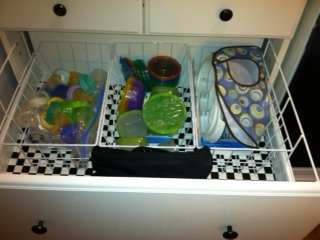
Next is Reed's drawer.  His containers for food, coolers for milk, bibs and baby food freezer trays.


The bottom drawer holds our storage for food - plastic containers, foil, cling wrap, etc.  Also pot holders and kitchen towels.  These baskets from The Container Store were the perfect fit.


Above the stove we have snacks and cereal.  The baskets are holding open bags that would be all over the place otherwise.


I decided to open back up the corner cabinet to give the kitchen a more airy feeling.  Plus I love my Vietri dishes and wanted to be able to see them.


This cabinet is still not completely finished.  This did hold all of my cook books.  I opted to keep the ones I use the most on the counter and put the rest downstairs.  Now it holds my spices and cooking needs.


I am going to have my neighbor cut this melanine shelf from The Container Store to fit.  Then I will have a space to put this plastic caddy full of coffee and tea as well as other cooking needs on the top shelf.


This corner cabinet now has space for all of the gadgets and bakeware I seldom use.  The dog food is in here as well.  We buy in bulk and the big bag is downstairs in the laundry room.


Here are my pots and pans and baking dishes I use most often.  The lazy susan makes it easy to get to them.


The blender and steamer live below and only get pulled out when used.


Utensils - this drawer makes me happy!  I like how I can see everything!


My apron is hanging behind the refrigerator.  I did leave the toaster and kettle out because we use those daily.

So again, I didn't go crazy on lots of organizing tools but got just enough to make the space more functional.  It has only been a few days but so far so good!

Apr 23, 2012

Kitchen Organization Reveal - Part 1

My mother-in-law and I had a great time this weekend getting my kitchen back in shape.  I got so excited on Friday night to get started that I forgot to get many before pictures.  Er...that is code for I did not get any before pictures.  Sorry!  But let me get you a visual...imagine all your kitchen stuff just thrown in a drawer and you will know what I was dealing with.  I would try to straighten them up but the contents would just end up in a big mess.  Fingers crossed that what I have implemented this weekend will stick!

Here is what my kitchen looked like before I started.  One of the best things I did was remove the microwave.  I wish I could say I had a neat way to still keep it but keep it off the counter but I do not.  It will be given away.


So here is the step by step to what we did to get my kitchen organized.  Pretty reveal coming tomorrow!

1.  First I removed everything from all cabinets and drawers.  This is everything that was in my kitchen...I can't believe it!


Then I wiped down all surfaces with bleach cleaner and was left with this sparkling empty shell to work with.  Funny how my kitchen seems so much bigger without anything in it!


Pretty much every drawer and cabinet were empty of dividers or kind of organizational element with the exception of one corner cabinet.  Rudy and I put in the lazy susan several years ago.  It is handy but a little awkward to get things out of.


2.  Next I grouped contents by category such as pantry, baking, gadgets, spices, food storage, etc.  I made a pile for things I never use to go to charity and a pile of things I use rarely and wanted to keep.  These items will have to be stored elsewhere in my house to pull out on those rare occasions.

3.  Then we went back in the kitchen and determined where to place things based on access.  We put things I use often in easy to reach places.  The things I didn't use very much were tucked away in the corner cabinets or in the back of a cabinet.


I didn't move my glasses and plates because my plates will only fit in the corner cabinet and my glasses work for me where they were.


4.  After that, we determined the types of containers and dividers we needed for the space.  We knew we needed more storage trays for utensils and cooking gadgets as well as baskets or containers to hold Reed's things and odd sized food items.  We started by putting almost everything in the drawers to get a feel of what we were working with.  I measured the spaces and wrote them down.

5.  We went to our local organization retailer (we used The Container Store) armed with our measurements and somewhat of an idea of what we were looking for.  It did help that I had scouted out their website before hand.  We went out to lunch.  Reed had fun sitting at the "big boy" table.  This was his first time in a restaurant high chair!


6.  We made our purchases and placed in kitchen.  I had to go back to make a return of somethings before finding the right pieces.  Because we did such a good job of organizing and getting rid of things I actually had a place for the items I don't use very often as well as space to bring back up some items I had stored in the basement.  Very excited about that! 

Here is what we ended up with from The Container Store.

Expand-A-Drawer Cutlery Tray - on SALE $12.99

Madesmart Cutlery Tray - $14.99

Madesmart Drawer Organizers - $1.99-$5.49

Freezer Storage Basket - Small - $5.99

Linus Divided Cabinet Organizers - On SALE $5.99

White Melamine Shelf - $12.99
(This looks identical to my shelves...once my neighbor cuts it down the right size, my cooking and spice cabinet is going to be money!)


In total, I spent about $130...I know it sounds like a lot.  But I think it was worth it to get my kitchen up to snuff.  There are three plastic bins very similar to the Linus Divided Cabinet organizers that I purchased in the bath section.  The label reads Bath and Vanity Organizer.  I cannot find them on the website but they were about $6.99 apiece.  I think I may return them and look for something at the Dollar Store instead.  That would save some money.  Other than that I think everything was well worth the effort and money I spent.

I just have to put the finishing touches on the space...can't wait to show it off tomorrow!
Related Posts Plugin for WordPress, Blogger...